You won’t believe this, but the average family runs about 10 loads of laundry every single week! Wow, your washing machine really takes a beating with all that action, doesn’t it? That’s why knowing how to clean your washing machine properly is so crucial. Yet, let’s be honest, it’s a chore most of us totally skip!
If you neglect your machine? Oh dear, it becomes a perfect home for nasty bacteria, dirt, and grime. And trust me, that leads to stained clothes and really unpleasant odours. But here’s the good news: regular cleaning every three to six months keeps your machine in tip-top shape. Quick heads-up for front-load and HE washer owners – you need to clean monthly because these machines use less water.
Your washing machine’s performance really matters, and I’m here to help you keep it happy. You’ll learn the quickest ways to get your machine spotless and running smoothly. We’ll cover everything, from getting rid of stubborn mould in those rubber seals to deep cleaning the drum itself.
Ready to dive into everything about cleaning your washing machine? Let’s make absolutely sure your laundry comes out fresh and truly clean, every single time!
Why Your Washing Machine Needs Regular Cleaning
You know, lots of people think washing machines magically clean themselves. They figure all that water and detergent sloshing around must do the trick, right? Well, I must admit, that couldn’t be more wrong! Your machine actually collects dirt, leftover detergent, and bacteria with every single wash.
Signs your washing machine is dirty
Don’t worry, your washing machine will definitely tell you when it needs a clean. Look out for these clear signs:
- Unpleasant odours – Does your machine or even your freshly washed clothes smell musty or like rotten eggs? Yuck! This shouts bacteria growth and mould – the kind of damp problem that makes you wish you had one of the best dehumidifiers UK! Bacteria from dirty laundry just builds up inside over time.
- Black residue and stains – Spotted some black slime or mildew around the door’s rubber seal? That’s trouble right there. It’s often called “soap scum” and builds up from detergent, fabric softener, and tiny food bits that stick around.
- Poor cleaning performance – Are clothes coming out with mysterious stains, black spots, or somehow smelling worse than before? Oh dear, your machine probably needs a really good clean.
- Rough-feeling clothes – If you live in a hard water area, limescale can build up on the heating element and drum. This makes your laundry feel scratchy and might even irritate sensitive skin. It’s much like how limescale affects your kettle (and trust me, knowing how to descale a kettle is another lifesaver!).
How often to clean washing machine based on usage
How often should you tackle this cleaning job? Well, it really depends on how much laundry you do:
- Frequent users (families): Aim for monthly cleaning, or about every 30-40 loads. Since a typical family does around 10 loads weekly, cleaning monthly usually works perfectly.
- Light users (singles/couples): Giving it a clean every 2-3 months should be plenty.
Other things to consider: Got hard water? You’ll need to clean more often because those minerals build up faster. Also, if you often wash heavily soiled items (like muddy sports kits!) or use fabric softener a lot, plan for more frequent cleans.
My personal rule of thumb: Clean it every 40 loads, no matter your household size. And always keep an eye out for those warning signs – they’re your machine’s way of crying for help!
The consequences of neglecting maintenance
Now, let’s talk about what happens if you skip cleaning. To be honest, it can lead to some serious issues:
- Performance issues – All that buildup makes your machine work harder. It ends up using more energy and water. Especially in hard water areas, limescale can slash the heating element’s efficiency by 15-20%. You’ll eventually see that hit your utility bills!
- Reduced lifespan – Without proper care, the internal parts just wear out faster. Limescale is particularly tough on the heating element, pipes, and drum. This can lead to expensive repairs down the line – something nobody wants!
- Health concerns – Dirty machines become havens for bacteria and mould. You won’t believe this, but one load of underwear can contain up to 100 million E. coli bacteria! This can trigger breathing problems, skin irritations, and allergies, especially if anyone in your home has sensitive skin or asthma.
- Clothing damage – Those annoying black spots, bad smells, and rough textures aren’t just irritating – they can actually ruin your favourite clothes permanently.
The great news? Regular cleaning easily prevents all these problems. Seriously, spending just a little time on maintenance saves you money on repairs, keeps your clothes looking and smelling great, and helps your trusty machine last much longer.
Tackling the Detergent Drawer and Dispenser

Image Source: AEG
Okay, let’s talk about that detergent drawer! You know, the bit we usually ignore? Well, it might not get much attention, but trust me, it can cause big problems if you neglect it. This small compartment actually plays a huge role in how well your machine works and, honestly, how clean your clothes really get.
Common problems with detergent buildup
That mysterious gunk you sometimes see in your detergent drawer? It’s not just ugly – oh no, it creates real headaches! When leftover detergent doesn’t dissolve properly, it creates the perfect damp spot for mould growth. Urgh! The drawer often stays wet between washes, which just makes things worse. Here’s the lowdown on what can go wrong:
- Detergent residue on clothes: Ever pulled clothes out to find annoying white powder marks? That’s usually down to too much detergent. Your laundry looks dull, and I’ve found it can even irritate sensitive skin.
- Blocked dispensing jets: You know those little holes that spray water into the drawer? Gunk from fabric softener and detergent can block them up. This stops the detergent and softener getting distributed properly during the wash. Not good!
- Unpleasant odours: Getting a whiff of mustiness from your machine? It’s probably mould and bacteria having a party in the leftover mess in your detergent drawer.
- Machine performance issues: Really bad buildup can even lead to leaks and drainage problems. You might end up with permanent damage to your machine – which is why knowing how to clean your washing machine properly, including this drawer, is so vital.
Step-by-step cleaning process
Guess what? You don’t need fancy tools to clean your detergent drawer – just a bit of effort and attention to detail. Here’s how I tackle it:
- Remove the drawer: Safety first! Unplug your machine. Now, have a look inside the drawer housing for a release button or lever (often blue!). Push or lift it while gently pulling the drawer forward until it pops right out. Easy!
- Soak the components: Fill your sink with warm water and let the drawer soak for about an hour. This really helps soften up any stubborn residue. For really grimy drawers, I swear by a 50/50 mix of hot water and white vinegar – works wonders!
- Scrub really well: Grab a stiff nylon brush or an old toothbrush and give every nook and cranny a good scrub. Pay extra attention to the fabric softener compartment and the little siphon tube (you can usually pull this out) – these spots get clogged with waxy buildup so easily.
- Clean the housing: Don’t forget the space where the drawer lives! Spray inside with warm water or your vinegar mix and scrub with a brush. Make sure to clean the ‘ceiling’ of the cavity, especially where the water jets (those “shower holes”) are. Keeping these clear helps dispense detergent properly.
- Dry and reassemble: Let everything air dry completely before putting the drawer back. Honestly, any leftover moisture is just asking for mould to return!
Preventing future residue
Want to keep that drawer cleaner for longer? It’s easier than you think with these simple habits:
- Measure correctly: Oh my goodness, so many people use too much detergent! Check the instructions on the box or bottle – using more doesn’t actually make clothes cleaner, it just causes buildup.
- Leave it open: After you’ve finished your laundry, leave the detergent drawer and the machine door slightly open. This lets air circulate and helps stop mould growing in the dampness.
- Regular maintenance: Make cleaning the drawer part of your monthly routine, especially if you use fabric softener often or live in a hard water area.
- Run hot cycles occasionally: Try running an empty, hot wash cycle (around 90°C if your machine allows) once a month. This really helps dissolve any powder residue that builds up more easily in cold washes.
- Consider liquid alternatives: Liquid detergent generally dissolves better than powder, especially in cooler water. This often means less residue. But remember, you’ll still need to clean the drawer regularly!
Adopting these simple habits will seriously help your washing machine last longer. Plus, you get the reward of perfectly clean and fresh-smelling clothes every single time. You can’t beat that!
How to Deep Clean Your Washing Machine Drum
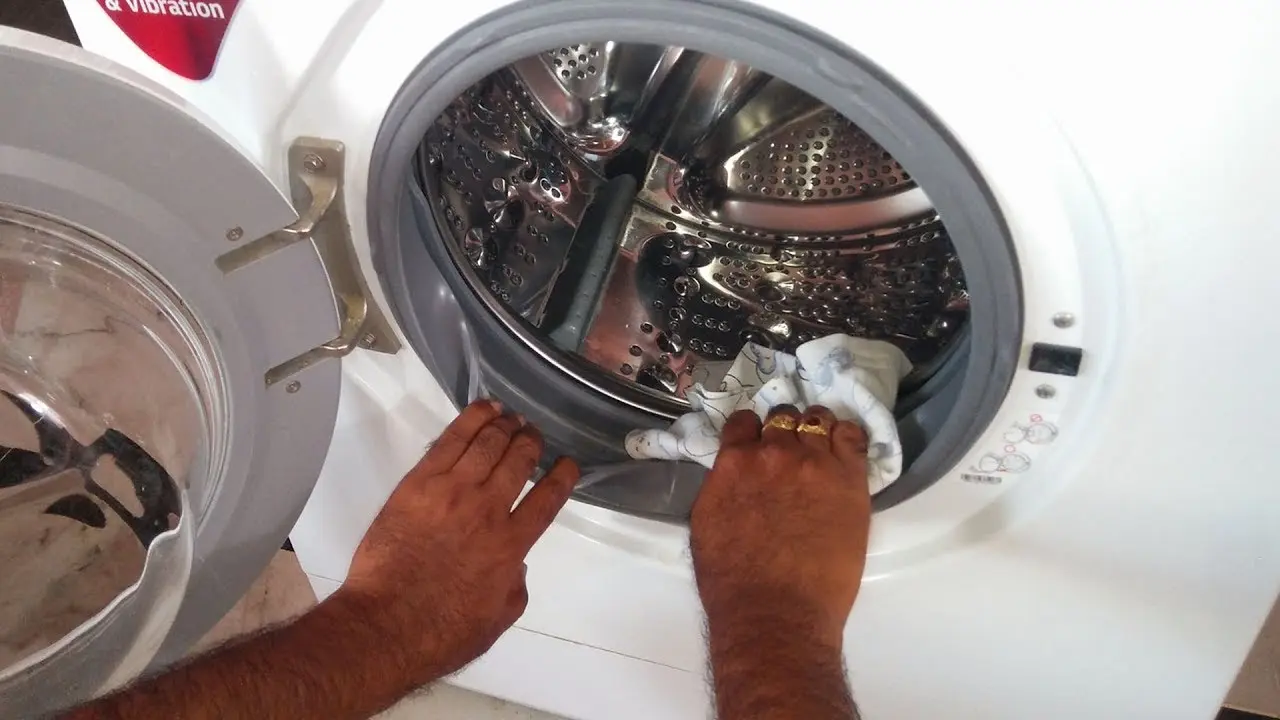
Image Source: YouTube
Right, let’s get to the heart of the matter – the drum itself! You might think it gets clean automatically with all that water and soap constantly sloshing around, but nope! To be honest, your washing machine drum can still get pretty grimy over time. Trust me, keeping the drum clean is a massive part of knowing how to clean your washing machine effectively overall. It’s vital for getting genuinely fresh laundry and helping your trusty machine last longer.
Removing visible debris and foreign objects
First things first, before you even think about deep cleaning, you’ve got to check your drum for any trapped items. Heard any weird rattling or grinding noises during spin cycles lately? That usually means something sneaky – like a coin or bra wire – is stuck between the inner and outer drums. Here’s what I do:
- Grab a torch and have a good look through all those little holes (perforations) in the drum.
- Slowly turn the drum by hand – this helps you spot anything hiding.
- Feel for any resistance as you turn it. If it feels stiff or catches, something is likely trapped.
Sometimes you might need to gently pull back the rubber door seal (the gasket) just enough to create a small gap. You can then use something thin and flexible, like a cable tie, to carefully feel around between the inner drum and the outer tub for tricky objects. If you’re feeling brave (and know what you’re doing!), another option is unscrewing the back panel to access the heater area, or removing the bottom panel to check the sump hose – these are common spots where lost items collect.
Using the right cleaning agents for your drum type
Now, what should you use to clean the drum? Well, your machine type helps decide the best cleaning solution:
For all machines:
- White vinegar: Oh yes, good old white vinegar! Pour 1-2 cups straight into the drum. It’s brilliant at dissolving residue and killing bacteria. A great natural option, similar to how you might descale a kettle!
- Baking soda: Another kitchen hero! Half a cup helps break down tough buildup and gets rid of nasty odours.
- Commercial cleaners: You can also find products specifically made for this, like Dettol Washing Machine Cleaner. These are usually designed to kill 99.9% of bacteria.
Extra tips based on drum material:
- For stainless steel drums: You’re in luck! Both acidic cleaners (like vinegar) and alkaline ones (like baking soda) generally work well.
- For plastic drums: I’d stick with gentler options like vinegar and definitely avoid any harsh chemicals.
Running a cleaning cycle effectively
Want the best results from your cleaning cycle? Here’s the secret to running it effectively:
- Make sure the drum is completely empty – no laundry left behind! Remove any visible bits you found earlier.
- Add your chosen cleaning agent directly into the drum (whether it’s vinegar, baking soda, or a commercial cleaner).
- Select the hottest water temperature setting your machine offers (usually 60-90°C) and choose the longest wash cycle available.
- If your machine has a special “Drum Clean”, “Tub Clean” or similar cycle – definitely use that!
- Once the cycle finishes, grab a clean cloth and wipe down the inside of the drum to remove any loosened residue. Got stubborn stains? You can make a paste with baking soda and water and gently scrub them with an old toothbrush.
Manufacturers generally recommend you clean your washing machine drum every 3-6 months. However, if you notice bad smells or see visible mould – yuck! – clean it right away, no matter when you last did it. And here’s my top tip: always leave the machine door slightly ajar after every wash. This allows air to circulate, stopping moisture buildup and preventing that dreaded mould from taking hold – just like using one of the best dehumidifiers UK can help manage dampness elsewhere in your home!
Cleaning Critical Components: Filters and Seals
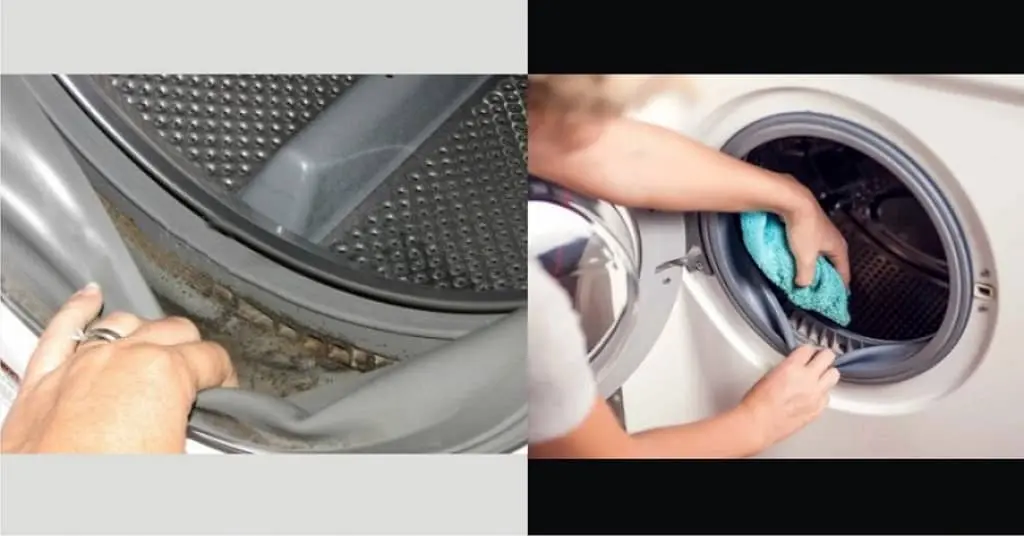
Image Source: DIY
Okay, let’s dive into two bits people often forget – the filter and those rubber seals! Trust me, these components might seem small, but they massively affect how well your machine works. Looking after them properly helps your machine run smoothly and can save you from some pricey repairs down the line.
Locating and accessing your machine’s filter
Your machine’s filter? It’s super important! It catches all the debris (lint, coins, buttons – you name it!) that could otherwise damage the pump. You’ll know if it’s clogged because your machine might start vibrating like crazy, stop mid-cycle, or leave your clothes soaking wet. Nightmare!
So, where is this mystery filter?
- Front-loading machines: Usually, you’ll find a little flap or panel in the bottom right corner on the outside. Pop it open, and there it is!
- Top-loading machines: It’s often hidden underneath the agitator (the bit in the middle that spins).
Can’t find it? Don’t panic! Your owner’s manual should show you exactly where it lives.
Here’s the quickest way I’ve found to clean the filter:
- Safety first! Unplug the machine and turn off the water supply taps.
- Grab an old towel and a shallow dish or tray. Put them under the filter area – trust me, some water will come out!
- If your machine has a small drain hose near the filter, pull it out, remove the cap, and let the water drain into your container.
- Now, carefully turn the filter cap anti-clockwise (lefty-loosey!) and gently pull it out. Brace yourself for what you might find!
- Clean out all the trapped gunk – coins, buttons, hair grips, lint balls, the works.
- Give the filter itself a good rinse under warm running water.
- Before putting it back, check the impeller (a little propeller fan inside the housing) spins freely. Then screw the filter back in clockwise until it’s tight. Job done!
Proper cleaning techniques for rubber seals
Ah, the rubber door seal (also called a gasket). It sits between the door and the drum and desperately needs regular cleaning to stop mould building up. You should aim to clean these seals every 1-3 months, or more often if you spot any grime or catch a whiff of something unpleasant.
Here’s how to get them sparkling:
- It’s best to do this after you’ve cleaned the drum (like we talked about earlier).
- Wipe all around and inside the folds of the seal with a damp, soapy cloth.
- Try to keep the seal attached to the metal drum while you clean – no need to pull it off!
- Got stubborn spots? An old toothbrush is your best friend here for a gentle scrub.
Addressing mold and mildew problems
You won’t believe this, but recent surveys showed almost all front-load washer owners reported issues with mould! It makes sense, really. Washing machines are the perfect breeding ground – they’re warm, wet, and full of detergent residue for mould to feed on.
Found some existing mould? Here’s how to tackle it:
- Mix up equal parts of household bleach and baking soda to make a paste.
- Pop on some protective gloves (important!) and carefully apply the paste directly onto the mouldy areas of the seal.
- Leave it to work its magic for about 15 minutes.
- Gently scrub the area with a soft brush.
- Wipe it all clean with fresh water and a cloth.
The best way to keep mould away? Leave the machine door slightly open after every use to let it air out. Giving the seal a quick wipe after each wash helps too. And running those hot water cleaning cycles monthly makes a big difference. These simple habits are key to keeping your machine running longer and your clothes smelling fresh, not funky! Plus, it helps avoid the damp conditions mould loves, just like using one of the best dehumidifiers UK can help manage dampness elsewhere in your home.
Troubleshooting Persistent Washing Machine Problems
Even if you’re brilliant at regular cleaning, sometimes your washing machine just throws a wobbly. These ongoing problems can be super frustrating, but often they have simple solutions if you know where to look. Understanding these persistent problems is another key part of knowing how to clean your washing machine effectively and when you might need extra help.
Eliminating stubborn odors
Got lingering bad smells that simple cleaning won’t shift? Oh, they usually point to hidden nasties lurking somewhere. Here’s what to investigate:
- Check for blockages: The filter and drain hose are the prime suspects for bad odours. Lay down towels before removing the filter (like we just discussed). Clean out any trapped debris. It’s amazing what horrors can lurk in hidden spots, a bit like finding out where those pesky tiny kitchen flies are coming from!
- Inspect the standpipe: This is the waste pipe your drain hose usually pushes into (often under the sink). It might be clogged. Get a bucket ready, carefully disconnect the drain hose from the standpipe, and check both the hose and the pipe for blockages.
- Examine the door seal: Musty, mildewy smells? Take a really close look at the door seal again. If mould has gotten deep into the rubber, cleaning might not be enough, and you may need to replace the seal entirely.
- Burning smell? DANGER! If you smell burning, switch off and unplug the machine immediately. This is serious. It usually means a problem with the drive belt or the motor. Don’t ignore it!
Dealing with limescale in hard water areas
Limescale buildup? If you’re in a hard water area like me, this can be a real pain for washing machines. When limescale coats the heating element, it takes much more time and energy to heat the water. This reduces efficiency and shortens the element’s life.
You really should descale your machine monthly if you have hard water.
- Commercial descalers: There are specific products designed for washing machines that work great.
- Natural alternative: Running a hot cycle (60-90°C) with a good glug of white vinegar (about 2 cups in the drum) also helps dissolve mineral buildup from internal parts – it works similarly to how you might descale a kettle!
Ignoring limescale will cost you in the long run. Your machine uses more energy, heating elements fail faster, and it can even damage main bearings. Regular descaling saves money on repairs and keeps your machine running efficiently.
When to call a professional
Look, you can fix many washing machine woes yourself. But sometimes, you just have to admit defeat and call in the experts. Here’s when I know it’s time to pick up the phone:
- Burning smells (even after you’ve unplugged it).
- The machine stops randomly mid-cycle frequently.
- Water leaks that aren’t simply fixed by cleaning the filter or checking hoses.
- Clothes consistently coming out stained or still dirty.
- Strange, loud noises during the wash or spin cycles (grinding, banging).
If your machine has several problems at once, or if issues keep coming back after you’ve tried troubleshooting, it’s definitely time to call a qualified technician. They have the skills and tools to handle complex electrical faults, motor problems, or drum bearing failures that are way beyond a DIY fix.
Conclusion
So there you have it! Learning how to clean your washing machine doesn’t need to feel like just another boring task on your endless to-do list. Honestly, putting in a little regular effort saves you money, helps your trusty appliance last so much longer, and, best of all, gives you brilliantly cleaner laundry every single time. Who wouldn’t want that?
This guide on how to clean your washing machine showed you some simple steps that make a massive difference. Remember those basic habits we talked about?
- Cleaning out the detergent drawer once a month.
- Running a hot water cycle every now and then.
- Checking the filter often.
- Dealing with little issues before they become big headaches!
These quick tasks, a core part of knowing how to clean your washing machine, will genuinely help you dodge costly repairs and protect your investment. Following my tips on how to clean your washing machine is easier than you think!
Think about it: a well-maintained machine uses less power and keeps your clothes smelling wonderfully fresh. When you start these routines for how to clean your washing machine today, your machine will thank you by working reliably for years to come. My best advice on how to clean your washing machine is simply consistency. Just a few minutes of care each month rewards you with spotless laundry and a machine that works perfectly. Now that’s a win-win! This whole process of how to clean your washing machine is worth mastering.
FAQs
Here are some common questions I get asked about how to clean your washing machine:
Q1. How often should I clean my washing machine?
A1. Great question! If you use it a lot (like busy families), aim to clean your washing machine monthly, or roughly every 30-40 loads. That’s a key part of how to clean your washing machine effectively. For lighter users, every 2-3 months is usually fine. But, listen to your machine! If you notice any horrid odours or see mould, clean it immediately – don’t wait! Dealing with issues promptly is crucial for how to clean your washing machine.
Q2. What’s the best way to clean a washing machine?
A2. The best way for how to clean your washing machine drum involves running an empty, hot water cycle (60-90°C) using either 1-2 cups of white vinegar or a specialised washing machine cleaner poured straight into the drum. Got stubborn buildup? A paste of baking soda and water can work wonders for scrubbing specific spots. But remember, knowing how to clean your washing machine properly also means tackling the detergent drawer, filter, and rubber seals separately, like we discussed!
Q3. How do I get rid of bad smells in my washing machine?
A3. Ah, the smelly machine problem! Getting rid of odours is a common question about how to clean your washing machine. First, check and clean the filter and drain hose – blockages are often the culprits. Then, run that empty hot cycle with white vinegar; this step in how to clean your washing machine really helps neutralise smells. If the pong persists, carefully inspect the door seal for hidden mould and clean it thoroughly. My top tip: always leave the door and detergent drawer slightly open between washes to let air circulate and stop moisture buildup.
Q4. Is it safe to use vinegar and baking soda to clean my washing machine?
A4. Absolutely! Using vinegar and baking soda are generally safe and effective natural methods for how to clean your washing machine. White vinegar is fantastic for dissolving mineral deposits (like limescale) and killing bacteria. Baking soda is brilliant at neutralising odours and breaking down grime. Just one thing – it’s usually best to use them separately (e.g., vinegar in the main cleaning cycle, baking soda paste for scrubbing) as mixing them directly can make them less effective. They are great tools in your arsenal for how to clean your washing machine.
Q5. When should I call a professional to service my washing machine?
A5. Good point! While this guide covers how to clean your washing machine for most issues, sometimes you need an expert. Knowing when to call a pro is important. Definitely get help if you notice burning smells (switch it off immediately!), if the machine keeps stopping mid-cycle, if you have significant water leaks, if clothes still come out dirty after cleaning, or if you hear loud, unusual noises. These could signal complex problems needing professional diagnosis and repair, beyond the scope of standard advice on how to clean your washing machine.